

If you’ve recently upgraded from Audiense’ free platform to our full access Insights, then you might have noticed that the audience builder looks a bit different, and that you have many new functions at your fingertips. You have the opportunity to create advanced audiences using the advanced audience manager, and like a kid in a candy store, you want to try everything. Well, let me help you to get started to create your first full audience intelligence reports.
If you have read my guide on how to create your first free audience intelligence reports, then you’ll notice how I take a few ideas from there, add some new ideas, and include some more advanced search options. I speak with users everyday and use the platform myself, so my knowledge is a blend of users’ common objectives, as well as how to overcome their pain-points. We can all suffer from the occasional difficulty of inputting the ‘right’ criteria to get the best from an audience intelligence report.
To combat that, in this blog, I’ll walk through methods to achieve a great report, and overcome the obstacles, as well as the tips and tricks that will take your analysis a step further.
How to Create Your First Full Audience Segmentation Reports
- Profile Attributes: bio-keywords (e.g. mum/dad), demographics, age, followers of, interests - Using Inclusion/Exclusion
- Connect Dashboard Audiences (Likers/Engagers, Personality Traits, Recent Followers, Followings of, Public Lists)
- 3rd Party Accounts: competitors, profiles of interest - an insights report on their audience/recent followers
- Conversational Audiences: Keywords, Hashtags, URLs - Common/Trending topics in your Industry
- Upload a List/File (from Social Listening, or any Twitter IDs list)
- Upload a List of Emails (From CRM, From Email List, e.g. loyalty card holders)
- Audience of Uploaded Members combined with criteria (e.g. from a conversation combined with bio-keyword: data analyst)
- A pre-made audience from our library & customise
- Lookalike Audiences: Using influencers to run a new report
- Re-segment a large segment: Drilling further to find niche audiences
One last thing before we jump in, as this is an advanced use of Audiense, I’ll be referring to full use capabilities of the two complementary sides of the platform, which you’re probably already familiar with using: Connect and Insights. So strap in, and let’s begin!

1. Profile Attributes: bio-keywords (e.g. mum/dad), demographics, age, followers of, interests - Using Inclusion/Exclusion
Starting in a new segmentation report, one way you can define your audience is by profile attributes. This area includes: bio keywords, e.g. mum, dad, ceo, runner; location - from countries and regions, to town level; age groups; interests including sub-categories; followers of; and more. To refine your audience, use a combination of these criteria including AND/OR functions. Try it out!
Level up:
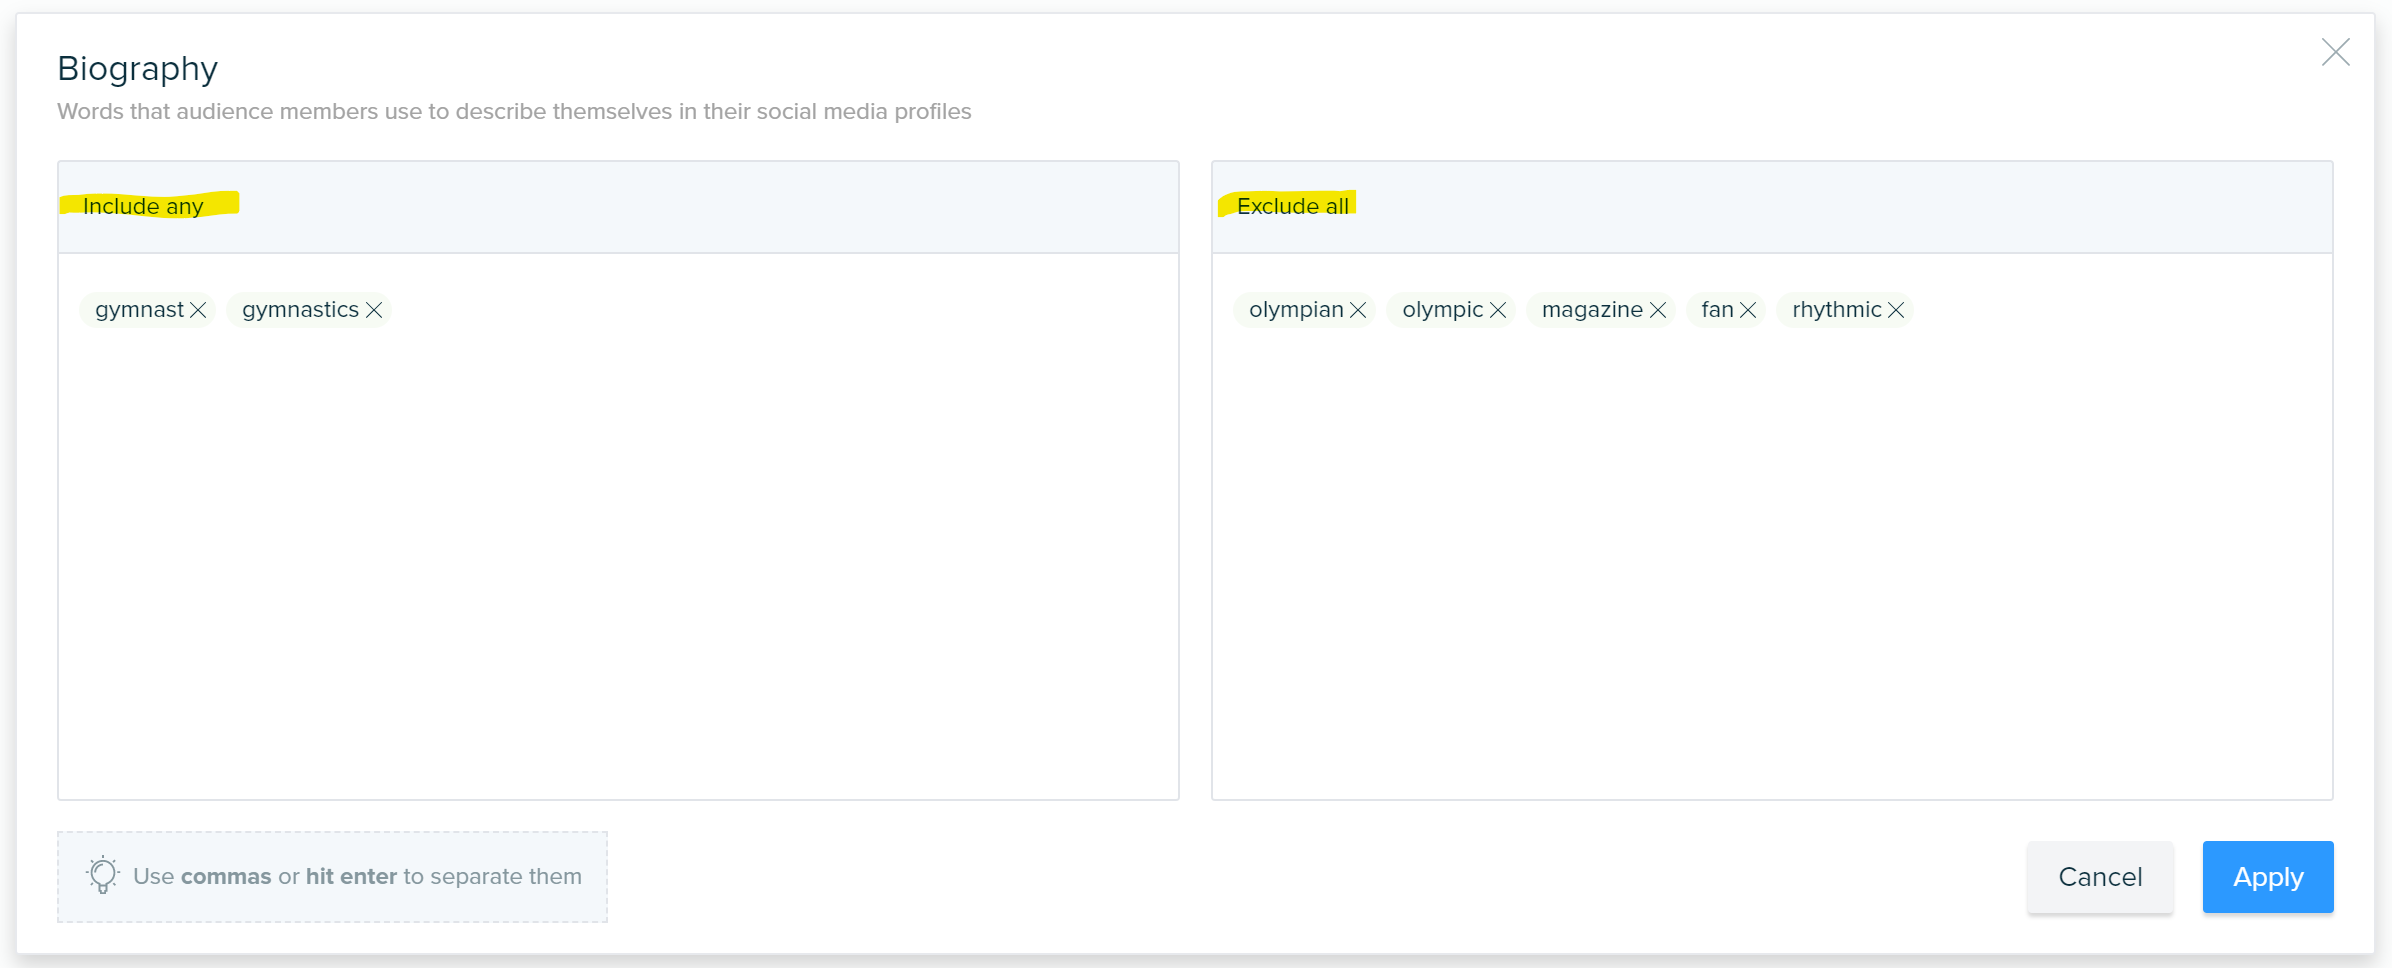
- It can be worth using the inclusion and exclusion criteria. Imagine I’m trying to find a more exclusive audience, say for example artistic gymnasts (the ones on bar, beam, floor, etc). I can begin by including bio-keywords: gymnast, gymnastics. That’s a good start, but it’s quite broad. I could then exclude bio-keywords: olympian, olympic, circus, rhythmic, magazine, fan. This inclusion/exclusion feature can be used in any of the criteria for the advanced audience manager. So, you could include the location of a country, but then exclude its major cities. You could include followers of @GretaThunberg AND not followers of @UN. Often, sometimes when we’re unsure what we are looking for, we might have some ideas on what we’re not looking for, and we can use this way of thinking to build a report.
- Go niche with location! Town, city, province, region, country. As you start typing into the location box, it auto-suggests matching locations. So, if you have specific location-based insights you want to gather, this is one for you.
2. Connect Dashboard Audiences (Likers/Engagers, Personality Traits, Recent Followers, Followings of, Public Lists)
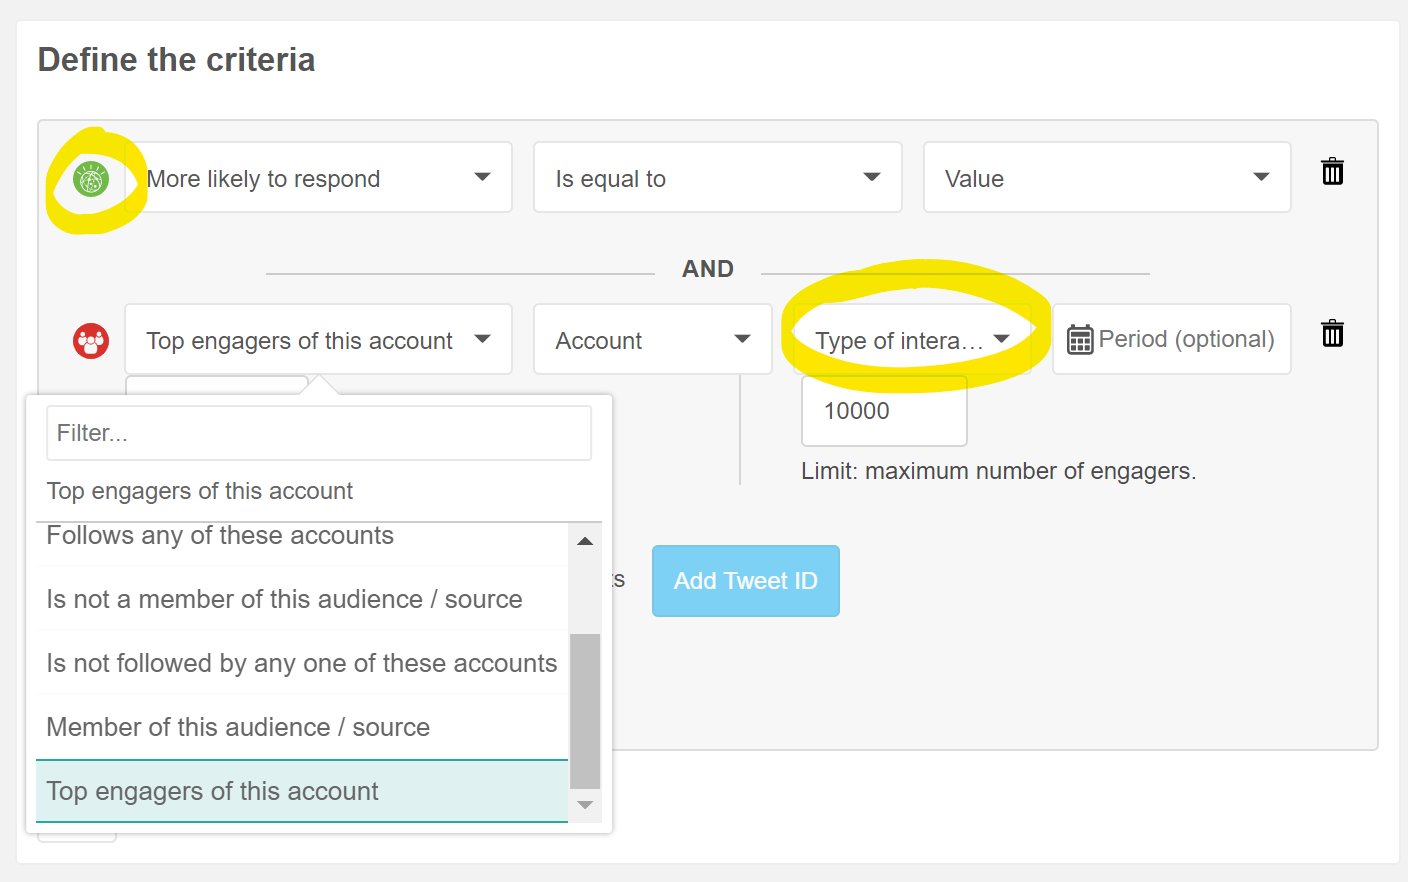
On the other side of the platform, in Connect, we can create audiences in a similar but more advanced way still. In Connect’s Audience Manager, you can build audiences based on personality traits, including all the attributes you’ve seen in an insights report, and other criteria including likeliness to respond. You can build audiences based on tweet recency, top engagers of my authenticated account, followed by @handle, verified status, member of public lists, and more. You can also combine all of these criteria, for example ‘mentions my account’ and ‘bio-keyword: marketing’, thus you can create your own audience panels based on interactions that matter to you.
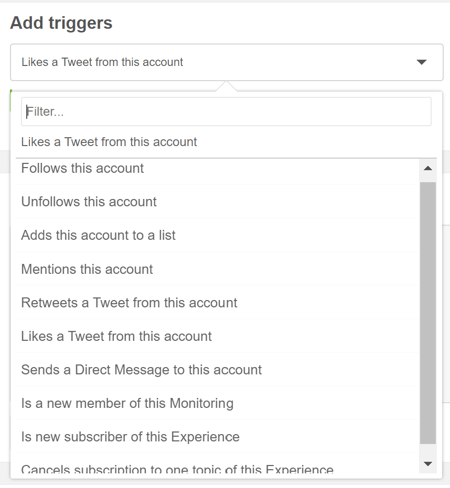
Then if you create a dynamic audience, you can also use triggers to build the audience, such as mentioning or retweeting your account.
You can explore all the options for yourself, as there’s many to choose from and combine. Once you’ve built and saved your audience, next time you want to create a segmentation report, you can select this audience from the dropdown list in profile attributes, here’s more details on how to do that.
Level up:
- Bring together the most active or most engaged or most recent users: your own social media supporters. Using either or a combination of the features mentioned, will deliver to you the people that enjoy your content, and in some cases, you might want to work with these people, either to collaborate with, or promote your content through to their audience.
- Target directly with ads. If you’ve made a well-defined audience, you have the option to push these direct matches into Twitter Ads and start targeting them directly. After creating the audience, you can select to browse it from the dashboard. Then, you can filter it further and create separate audiences for your own unique approach.
3. 3rd Party Accounts (an insights report on their audience/recent followers)
This method is quite easy, but a bit different from what we just learned above. As you already know, in Connect, you can add 3rd party accounts, allowing you to easily filter and see the whole audience of any other Twitter user. That means it can include competitors too, and you can easily choose ‘followers of @competitor’ in an insights report.
But did you know that you can use the ‘follows this account’ trigger in a dynamic audience for these 3rd party accounts? This is important because this will be an audience of users recently following the account, collected from when you build the audience. By highlighting active users with an interest in a product similar to yours, they are therefore potentially highly influenceable. As this audience grows, it can signal what kind of audience is currently interested, and can be used to produce an insights report on current trends within new audiences.
Level up:
- Considering groups of competitors? No worries! You can build one audience from multiple third party account @handles. E.g. potential partners based on business size or location.
- Use the baseline! Looking to compare your own competitor’s audience to your business? Or perhaps you’re validating partnerships, so you want to compare a new partnership opportunity to the audience of the brand it could team up with, and see where it fits or jars. It’s actually really easy! Build the audience, and run a report. Then, change the baseline to a report you’ve already created based on your brand.
This is also a great method to measure campaign performance. Build a report before the campaign, then run a new one after the campaign and compare the segments, depending on your aim, you might have grown one of your niche audiences, or discovered a new one! Take a look at the shift in influencers’ uniqueness or affinity. If you were to build an audience of new followers after the start of a campaign, you might find they have an affinity to an influencer that was at the forefront of the messaging.
4. Conversational Audiences - Common/Trending topics in your Industry (Keywords, Hashtags, URLs)
This is an advanced feature you won’t have seen in the basic audience manager! When you come to define an audience in Insights, you can use conversations! You can input keywords, hashtags, and URLs, and we’ll find matching content from the last 30 days to build an audience to create the segmentation report. This can be a great way to find people sharing content from outside sources, including your own website or links. Although, if you want to develop this with added criteria such as a location filter, or a more sophisticated Boolean query, you’ll have to create it in the Connect dashboard.
If you’re wondering what to input, you could look at the content panel of a recent report and choose the top hashtags.
Level up:
- Looking for a hard-to-define audience? Perhaps they’re not ultra self-descriptive in their bio? Topics can be a way of finding them! E.g. doctors speaking about a particular topic, strand of research, or terminology. Another example can be in political conversations surrounding current affairs or events that are being discussed online.
- Recently held an event? Doing some campaign analysis? You might have used a hashtag for people to join in with the buzz of it all, and you can input this hashtag to run a report! It also works well for TV shows, album releases, and online webinars.
5. Upload a List/File (from Social Listening, or any Twitter IDs list)
Another option is to upload a list directly into Audiense from a social listening query you’ve run in another platform. If you’re not already aware, Audiense complements social listening, and makes sense of the data for you. In many cases, users of Audiense might be monitoring particular keywords in a social listening platform for other reasons, such as online customer support, or sentiment analysis. Using Audiense, we can take the work you’re already doing to further understand the people driving the conversation. Sometimes we need to remind ourselves that different people and communities will use the same keywords in different ways depending on who they are, and the networks they’re in.
When you come to define the audience in an insights report, select the upload option. Since this method uses the Twitter IDs of the audience, if you already have a list from another provider or means, you can upload this in the same way.
Level up:
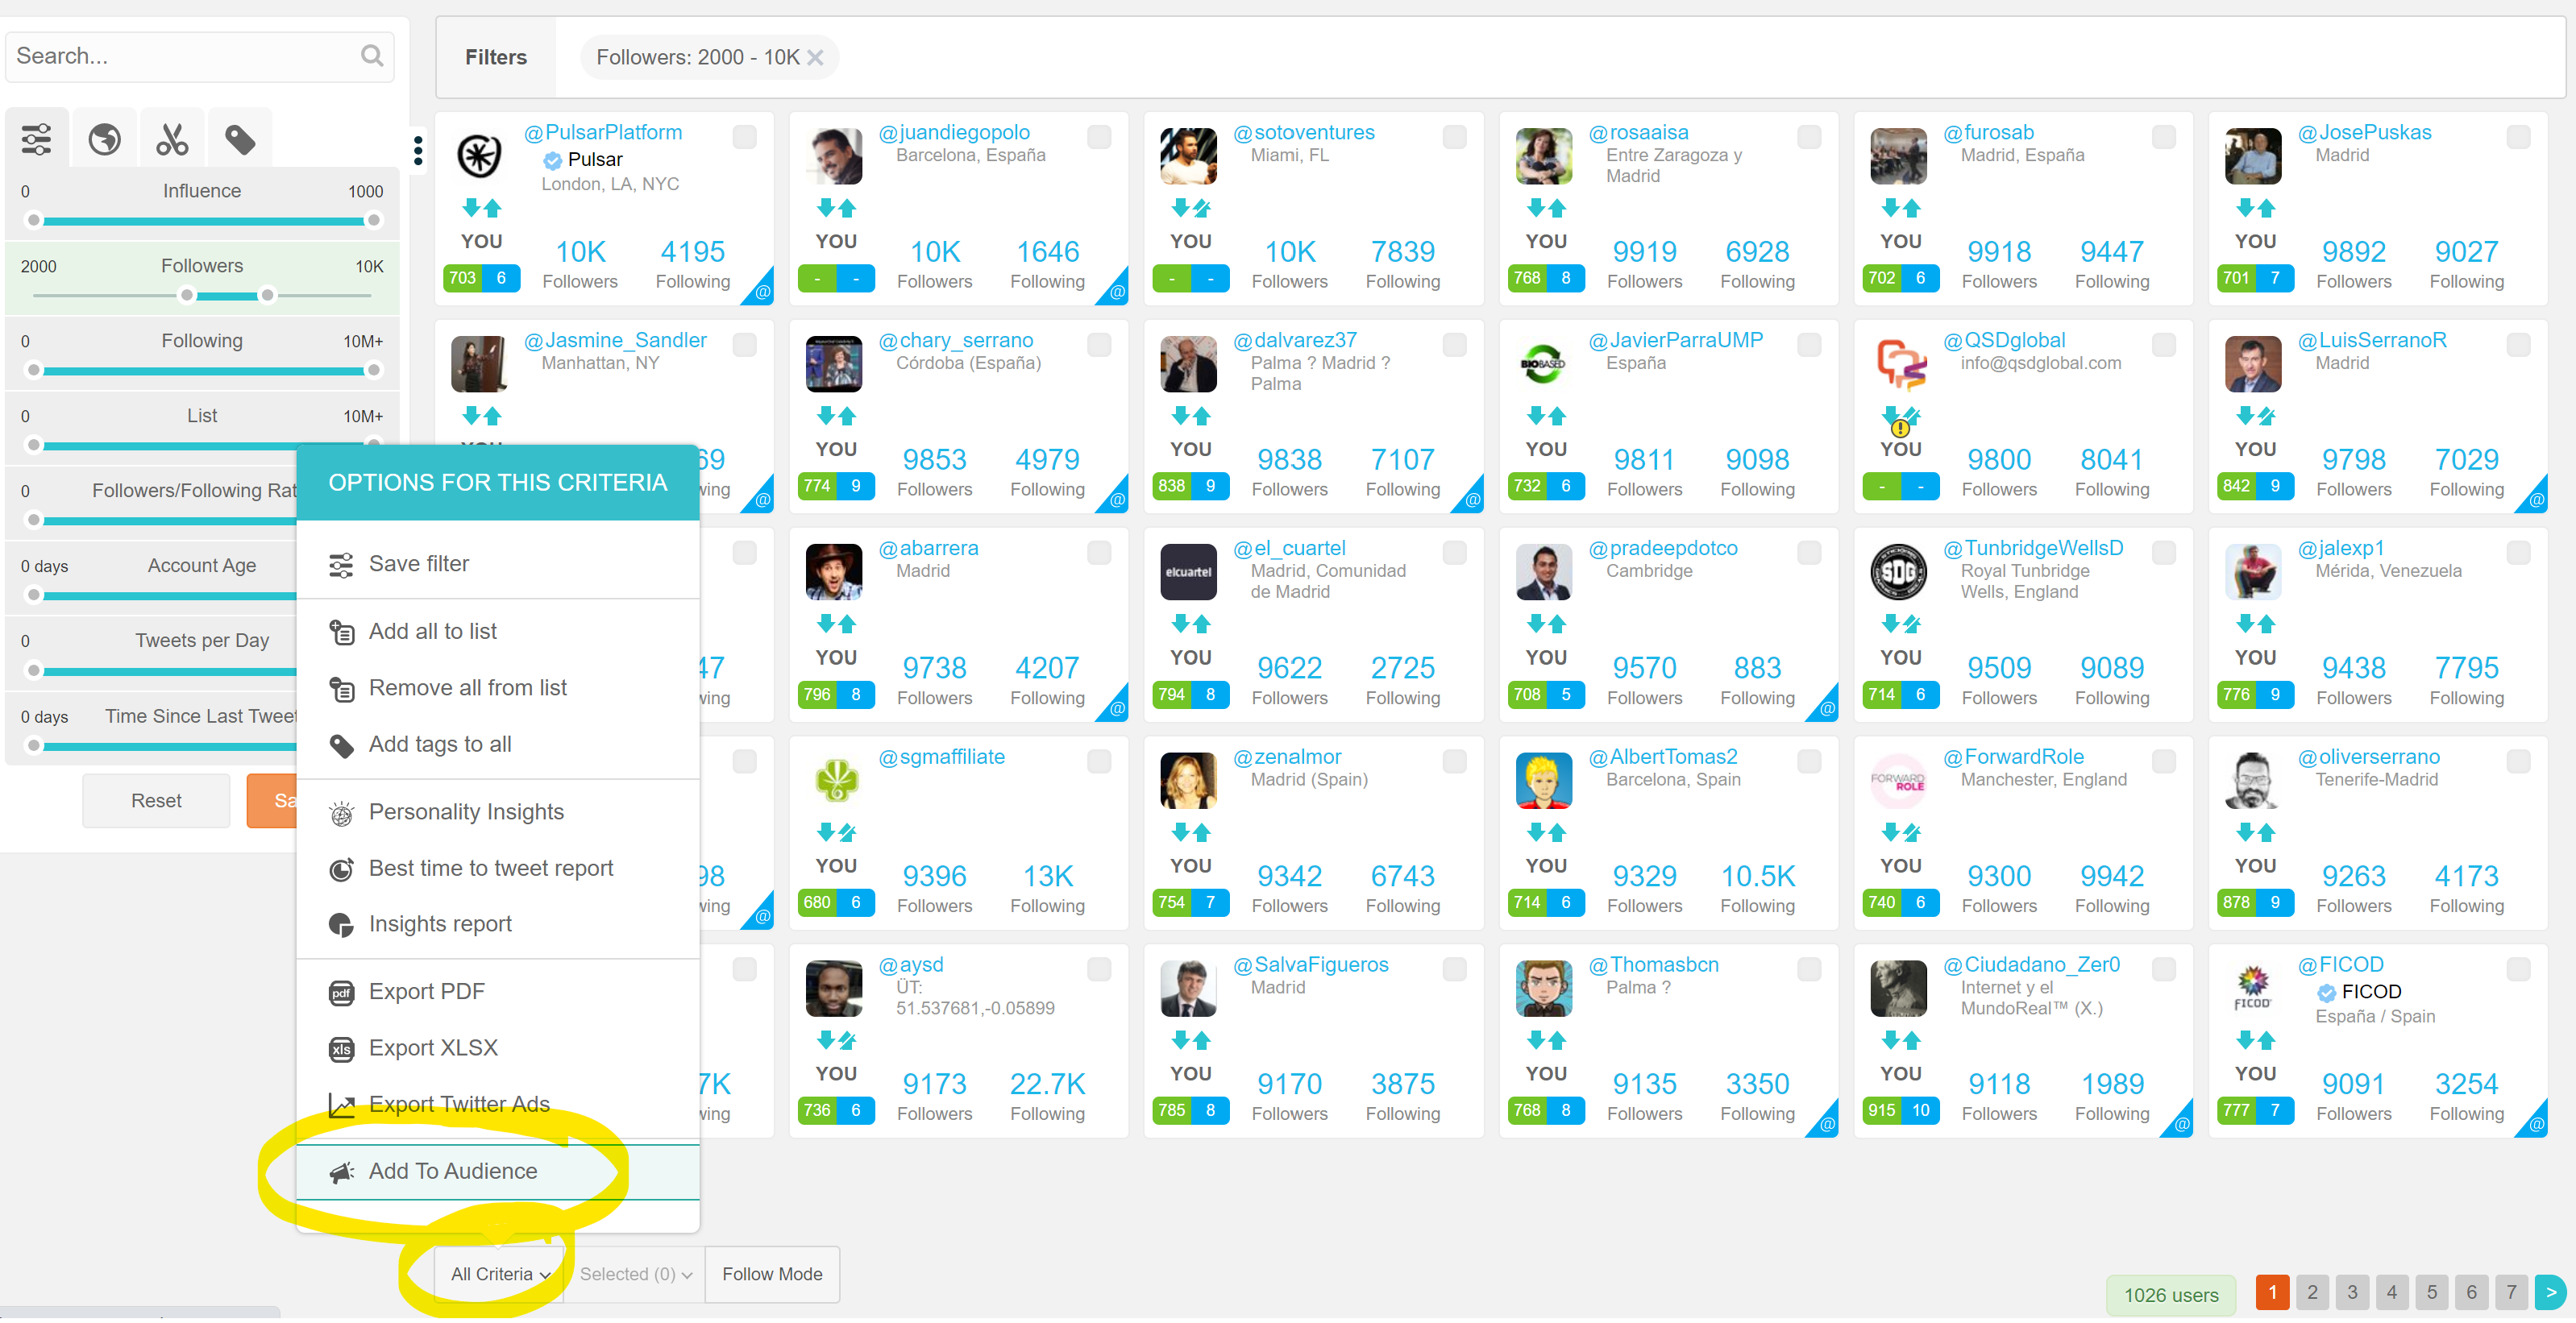
- If you’re already aware of the type of audience you want to find from your social listening query, for example, members with a following over 10K, then you can upload the audience into Connect first, filter it, and then select the new audience when creating an Insights report.
- Compare the change in the audience of the conversation of a time period. When you first ran the social listening query, it will have captured sentiment and topics and users of the range you input. However, if you were to revisit the same query definition with a more recent time range, you might find a difference in the audience members, or even particular users and influencers driving the momentum of the conversation. This is a good way to look beyond trending topics, and to discover trending voices.
6. Upload a List of Emails (From CRM, From Email List, e.g. loyalty card holders)
If you’re finding it difficult to produce a list of Twitter IDs of your audience, you might want to try uploading a list of emails instead. In Connect, you can upload a list of emails, and through a third party tool, Fullcontact, we’ll find matches to their Twitter IDs. This means you could upload lists from your CRM too. They’ll appear as an audience in Connect, and then you can select them when you create an Insights report, just like in step 2.

Level up:
- Don’t be stingy with the amount of emails you input. Once you exceed the free limit of emails added, you’ll only pay for each email for which a match is found.
- Consider the list you’re using! Just because it comes from your CRM, doesn’t make it perfectly relevant, check how you’re filtering that list in your CRM first. You could start with content downloaders, newsletter subscribers or loyalty card members, as you already know these are people that want to hear what you have to say.
7. Audience of Uploaded Members combined with criteria (e.g. from a conversation combined with bio-keyword: data analyst)
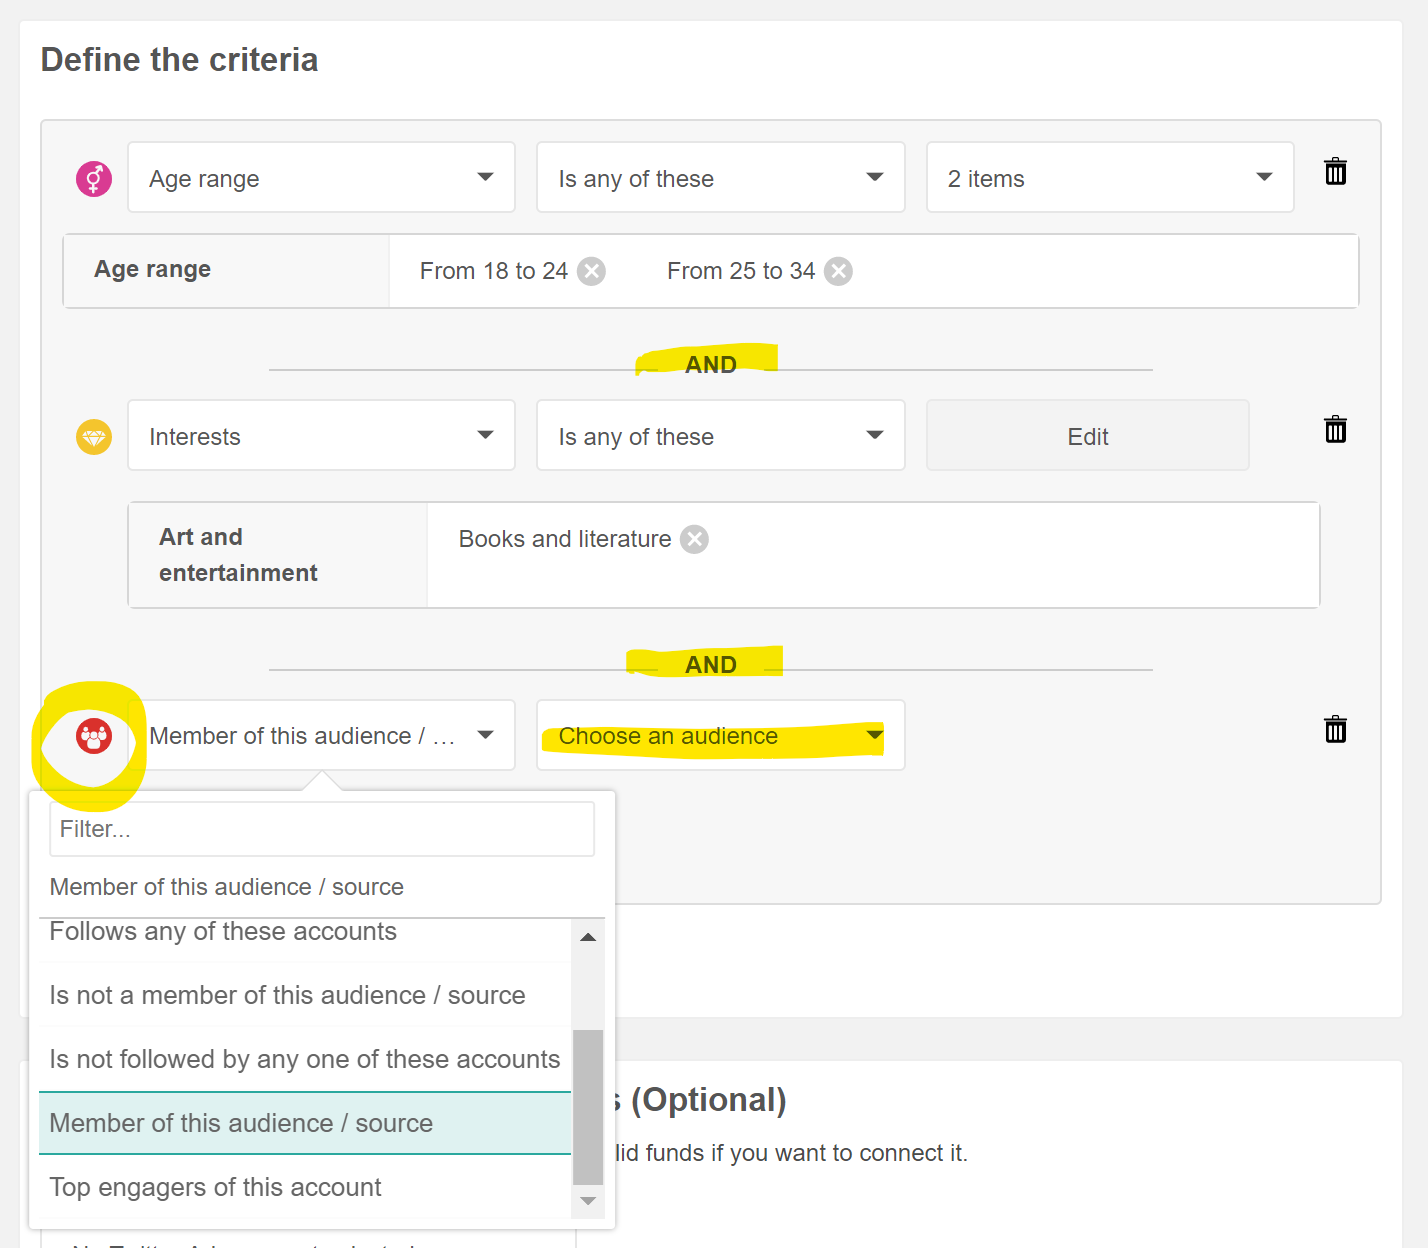
Talking about uploads, there’s more you can do. Once you’ve uploaded a list of audience members into Connect, for example from a social listening file, you have the option to combine with filters to narrow down the audience. For example, ‘member of this audience’ and ‘interests: books and literature’ and ‘age range: 25 to 34’ and ‘bio-keyword any of: writer, blogger’. This will create a new audience in your Connect dashboard, which you can then select in Insights to create an intelligence report.
Level up:
- If you need to individually curate groups, with any audience you create in Connect, you can always look over all the members in a panel. All you have to do is ‘click to browse’, you can then filter the view further, and when you’re happy, ‘add to an audience’. Then take it from there!
- Compare an uploaded members audience, divided by followers of your account, and people that don’t follow you. If you want to dig deeper into the differences between the audience of a query, you can combine the criteria ‘members of this audience’ and relationship: ‘follows any of these accounts’. And a separate one with ‘does not follow any of these accounts’ and inputting your own handles. Then create separate reports on both audiences.
8. A pre-made audience from our library & customise
You might have seen this method mentioned before, but it’s still a great one to use! If you have an idea of the group you’re looking for, but you’re really stuck on how to translate it into Audiense, we can help tailor it in the platform for you.
Take a look at what we have! From parents, to CMOs, to climate change supporters, and more.
Level up:
- Define your audience as much as possible. We’re here to help, but we can’t read minds, and we create each audience manually. If you’re an American business looking for American students, but only tell us you’re looking for students, we might not produce the best audience for you. Let us know as much definition as possible, so that we can help to customise that audience for you.
- Found a segment in the report that you’re keen on targeting? You can now ‘add as an audience’ in your Connect dashboard to a new or existing audience, then you can upload them into Twitter Ads. Alternatively, you can even use the targeting pack in the Insights report for targeting lookalike audiences on alternative platforms including Facebook.
9. Lookalike Audiences (use influencers to run a report)
If you’re looking to expand your audience of influencers, you can create lookalikes easily.
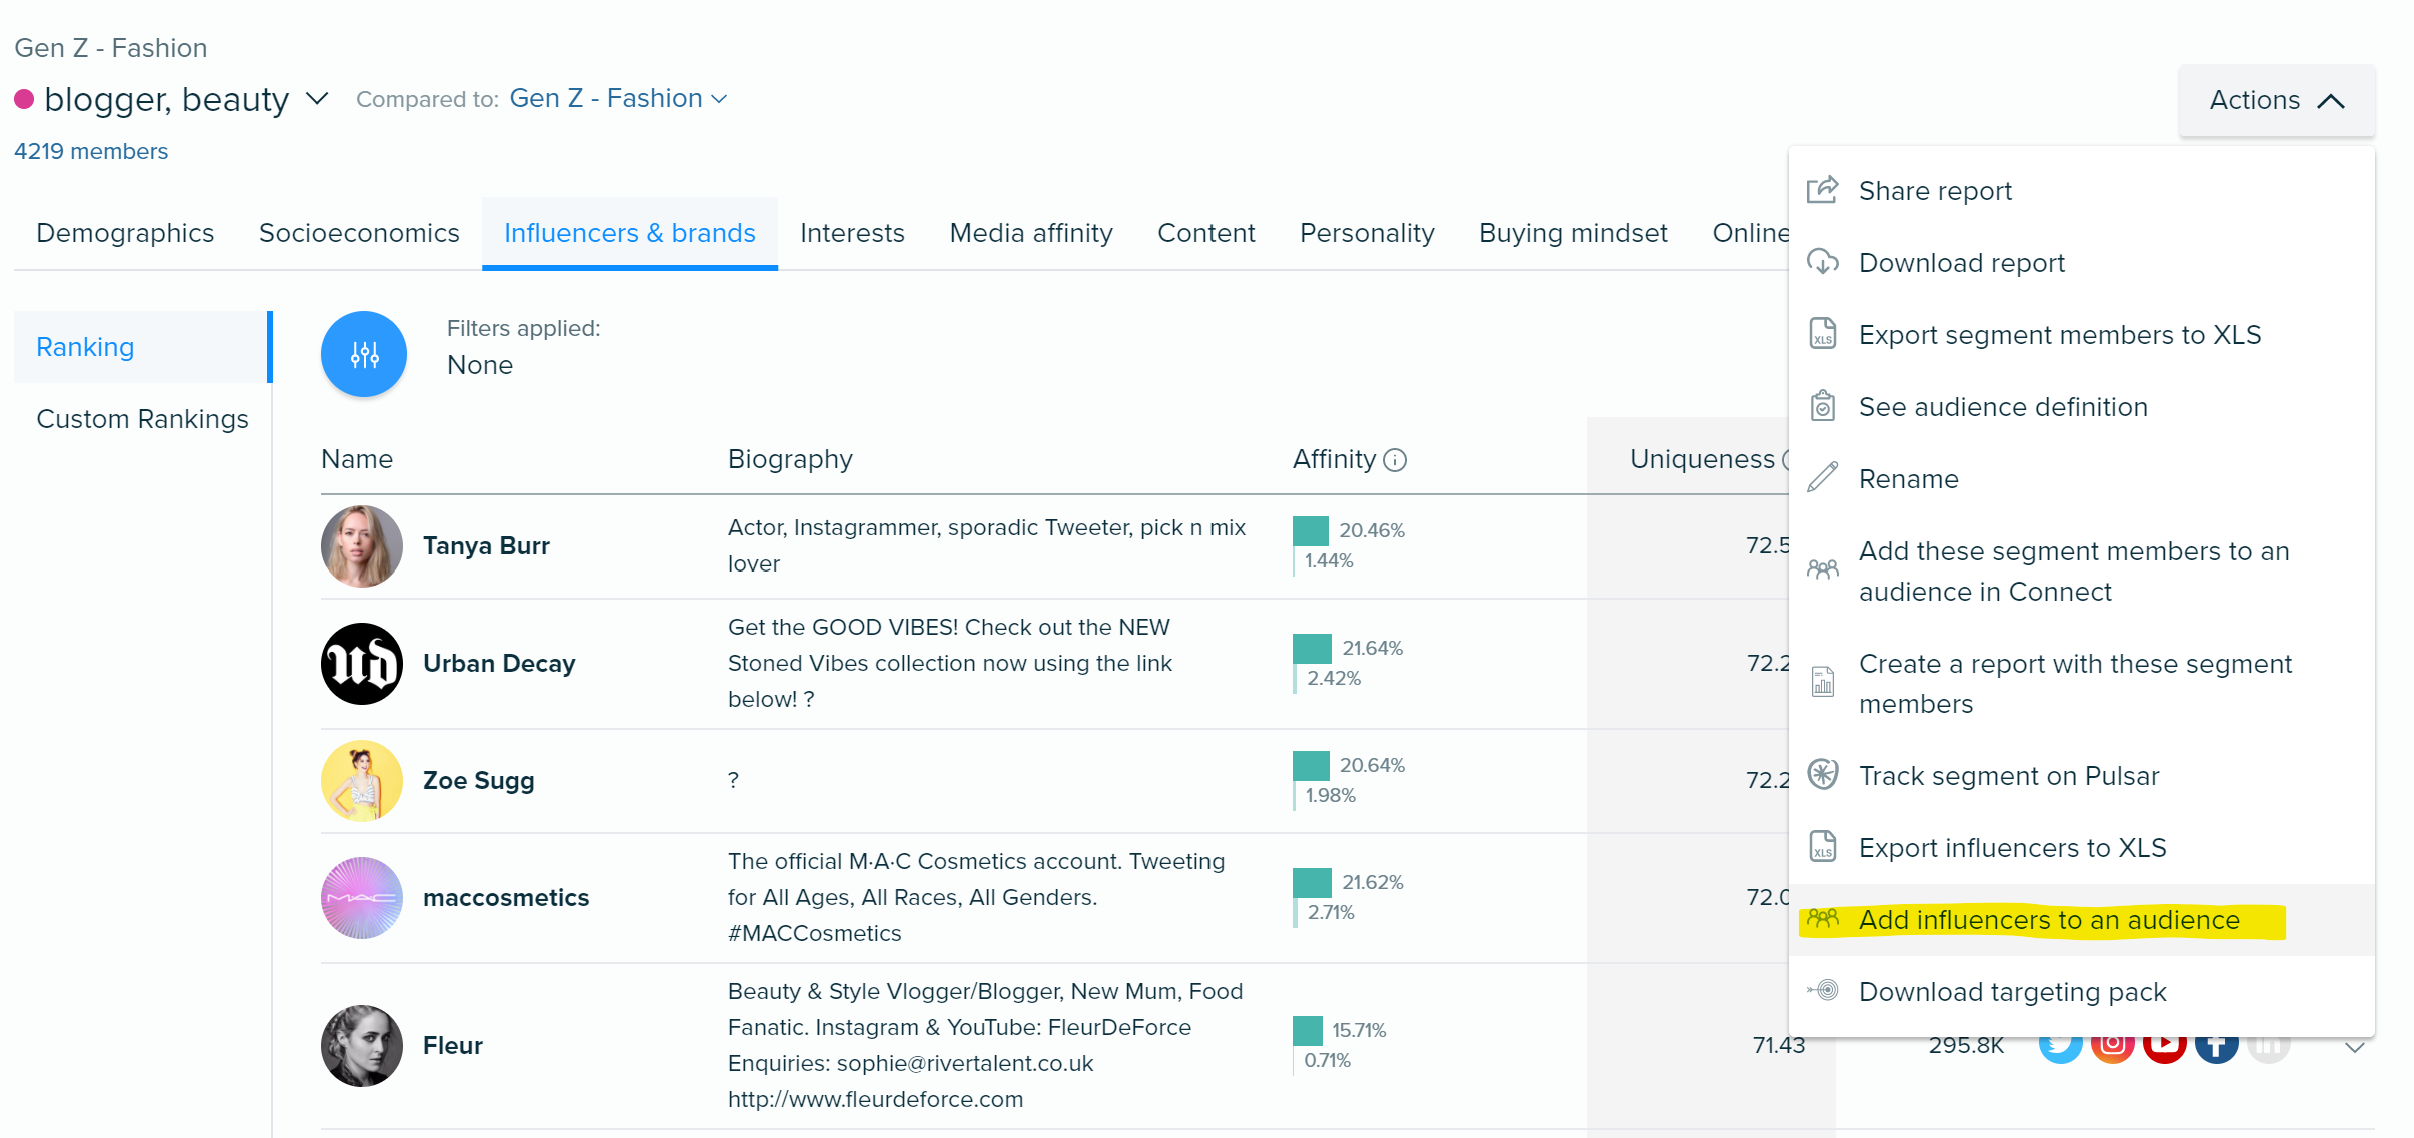
When you’re in the influencers panel, simply select ‘add influencers to an audience’ in the actions menu, and they’ll appear in Connect. Since they’re there, when you go to create a new insights report, you can select them from the drop-down (like I mentioned in point 2), and launch the report! When you go to the influencers panel in the new report, you have a whole new set of lookalikes that you can use. Easy!
Level up:
- You can filter the influencers for their reach, or filter for content creators. Once you’ve found the set of influencers you want to target, and added them to an audience in Connect, you can push ads out to them too!
- If you’re looking at influencers within an industry, by creating a report on the influencers themselves, you’re opening up your research to a whole new level of insights that you might have missed out on. This can be particularly useful in B2B use cases.
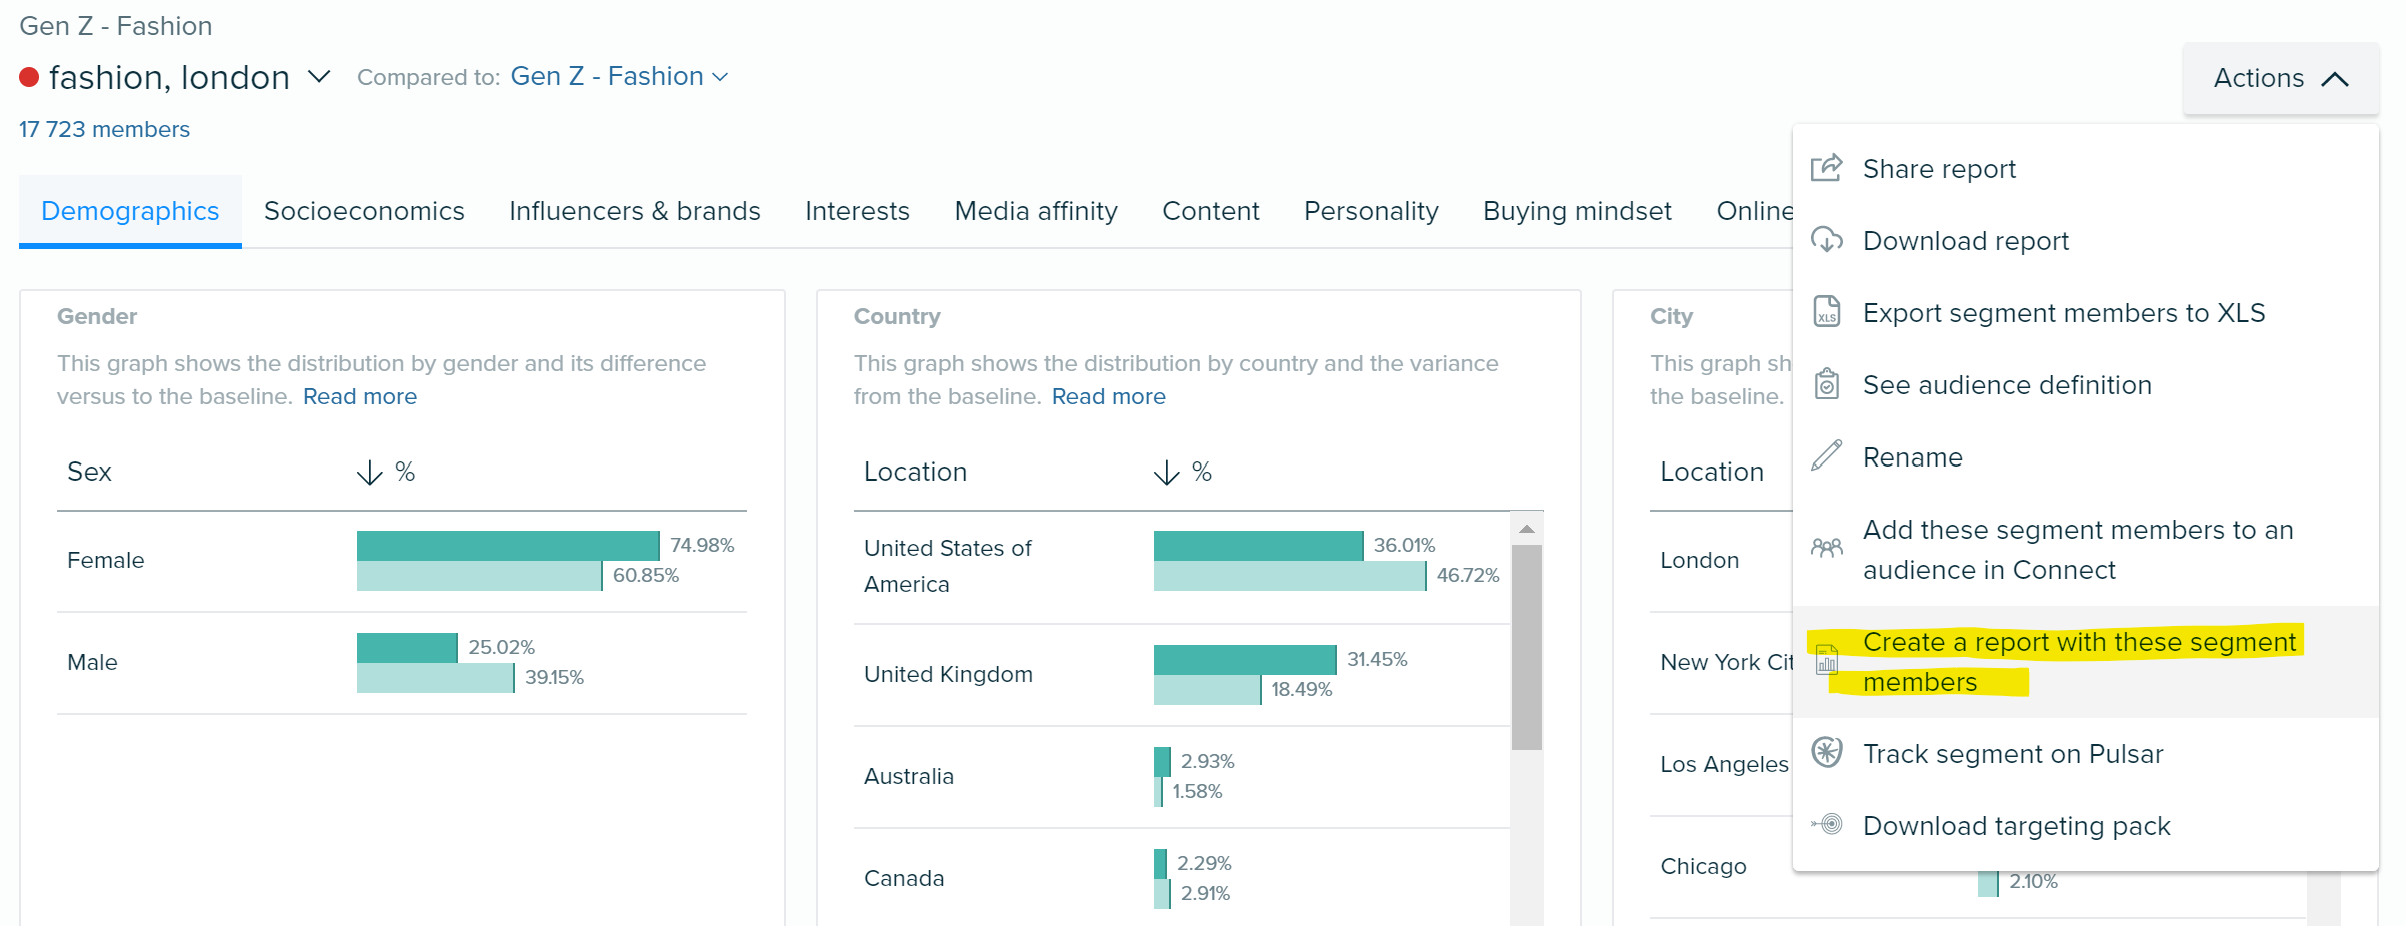
10. Re-segment a large segment
Another easy one here, but it can be incredibly illuminating. If you come across a large segment and feel that the insights aren’t drilled down enough, then re-segment it! In the actions menu, select ‘create a report with these segment members’. It’s as easy as that!
Want to see an example of how this worked out? Check out the climate conversation article I wrote!
Level up:
- Don’t forget to request additional segments, or delete them. An Insights report can provide up to 20 segments, but these might not be immediately shown, so simply ‘request additional segments’ for the others. Likewise, if something is irrelevant, select ‘delete’ and it will be hidden from view - useful for noisy audiences.
- Use the baseline to compare to your original report. Once you’ve found these additional niche segments, you can still compare them to the original wider audience, just select it in the baseline comparison!
How many of these methods have you used? And which ones didn’t you know about? These are my top recommendations based on other customers and users, and my own personal experience at Audiense. If you need any more help with these methods, you can find detailed step-by-step explanations in the user guide!